C用fseek实现替换文件中字符

使用fseek和ftell来移动到行首,替换字符串。代码如下

#include 
#include 
#include 
#define	BUFF_SIZE 256
int showHelp(){
    fputs("Usage:n", stdout);
    fputs("progname [filename] [oldstr] [newstr]n", stdout);
    fputs("n", stdout);
    return -1;
}
int replace(char *line, char *oldstr, char *newstr){
    char buf[BUFF_SIZE];
    char *p;
    int iLen = 0;
    p = strstr(line, oldstr);
    if(p) {
        memset(buf, 0x00, sizeof(buf));
        strcpy(buf, p + strlen(oldstr));
    }else{
        return 0;
    }
    iLen = strlen(buf);
    if ( buf[iLen-1] == 'n')
        buf[iLen]=0;
    *p = '';
    strcat(p, newstr);
    strcat(p, buf);
    printf("p=%sn", p);
    return 1;
}
int main(int argc, char **argv)
{
    char buf[BUFF_SIZE];
    FILE *fp;
    int iNum = 0;
    int i = 0;
    long sttell, endtell;
    if(argc != 4) {
        showHelp();
        return -1;
    }
    fp = fopen(argv[1],"r+");
    if(fp == NULL) {
        perror("open file error");
        return -1;
    }
    while( ! feof(fp) ) {
        sttell = ftell(fp);
        fgets(buf, 256, fp);
        if(replace(buf, argv[2], argv[3]) != 0) {
            endtell = ftell(fp);
            fseek(fp, sttell - endtell, 1);
            fputs(buf, fp);
            fseek(fp, sttell - endtell, 1);
            iNum++;
        }
    }
    fclose(fp);
    printf("num=[%d]n", iNum);
    return 0;
}
悲剧了

该站点VPS服务商倒闭了(晕,发邮件就是这样说的),但是数据没有了,气死我了。这个vps除了便宜一点好处也没有,稳定的时候没事,抽风的时候有死的感觉,服务商什么也不管,我也按时备份了,写的脚本,没有想到VPS数据没有了,没有异地备。
以前在dropbox备份一段时间数据,有些数据恢复了,有些通过google cache找回来了, 只有留言没有恢复,其他的都没有问题。
以后找个好点的服务商,按时备份,血的教训。

C qsort函数使用

#include 
int cmp(const void *a,const void *b);
int main(void)
{
    int num[]={10,2,4,1,4,6,7};
    for(int i=0;i < sizeof(num)/4;i++) {
        printf("%d,",num[i]);
    }
    printf("n---------------n");
    qsort(num,sizeof(num)/4,sizeof(num[0]),cmp);
    for(int i=0;i < sizeof(num)/4; i++) {
        printf("%d,",num[i]);
    }
    printf("n");
    return 0;
}
int cmp(const void *a, const void *b)
{
    return *(int *)a - *(int *)b;
}

测试PEM密钥文件是否匹配代码

工作中一直用过很多密钥,有时候为了验证密钥对很麻烦所以用openssl API写了一个小工具
实际上openssl命令也可以验证的,太麻烦了。
密钥生成(PEM格式)

openssl genrsa -out test.key 1024
openssl rsa -in test.key -pubout -out test_pub.key

#include 
#include 
#include 
#include 
#include 
#include 
char* my_encrypt(char *, char *);
char* my_decrypt(char *, char *);
//  FunName:测试密钥文件是否匹配
//  Date:20130314
//  shell>gcc -o test test.c -lcrypto
int main(int argc, char **argv)
{
char *str="I Love You";
char *ptr_en, *ptr_de;
char *rsafile, *rsapubfile;
if ( argc < 2) {
printf("Uages: %s id_rsa  id_rsa_pubn", argv[0]);
return -1;
}
rsafile=argv[2];
rsapubfile=argv[1];
ptr_en=my_encrypt(str,rsafile);
ptr_de=my_decrypt(ptr_en,rsapubfile);
if(ptr_en==NULL | ptr_de==NULL) {
printf("encrypt or decrtpt file NOT RSA FILEn");
return -1;
}
if(memcmp(str,ptr_de,strlen(str))==0) {
printf("rsa_file ok!!!!n");
}else{
printf("rsa_file err!!!n");
}
return 0;
}
char *my_encrypt(char *str, char *path_key)
{
char *p_en;
RSA *p_rsa;
FILE *file;
int flen, rsa_len;
if((file=fopen(path_key,"r"))==NULL){
perror("open key file error");
return NULL;
}
//if((p_rsa=PEM_read_RSAPublicKey(file,NULL,NULL,NULL))==NULL) {
          if((p_rsa=PEM_read_RSA_PUBKEY(file,NULL,NULL,NULL))==NULL){
ERR_print_errors_fp(stdout);
    return NULL;
}
flen=strlen(str);
rsa_len=RSA_size(p_rsa);
p_en=(unsigned char*)malloc(rsa_len + 1);
memset(p_en,0,rsa_len+1);
if(RSA_public_encrypt(rsa_len,(unsigned char*)str,(unsigned char*)p_en,p_rsa,RSA_NO_PADDING) < 0) {
return NULL;
}
RSA_free(p_rsa);
fclose(file);
return p_en;
}
char *my_decrypt(char *str,char *path_key)
{
char *p_de;
RSA *p_rsa;
FILE *file;
int flen,rsa_len;
if((file=fopen(path_key,"r"))==NULL) {
perror("open key file error");
return NULL;
}
if((p_rsa=PEM_read_RSAPrivateKey(file,NULL,NULL,NULL))==NULL) {
ERR_print_errors_fp(stdout);
return NULL;
}
rsa_len=RSA_size(p_rsa);
p_de=(unsigned char *)malloc(rsa_len + 1);
memset(p_de,0, rsa_len + 1);
if(RSA_private_decrypt(rsa_len,(unsigned char*)str,(unsigned char*)p_de,p_rsa,RSA_NO_PADDING) < 0) {
return NULL;
}
RSA_free(p_rsa);
fclose(file);
return p_de;
}

使用 ksar 工具分析系统性能

简介: 系统性能监测是 Unix 和 Linux 系统管理员一个重要工作。如果服务器系统性能突然低于平均应有的情况,问题可能来自在执行的进程、内存的使用率、磁盘的性能、网络流量和 CPU 的压力。在 IT 预算有限的今天,理解如何优化系统性能比以往任何时候都重要。一味地硬件投资并不是能够让人们接受的办法,并且有时候也不一定生效。通常系统管理员使用一些基础的工具(top、vmstat、mpstat、ps、free)来辨别和处理一些性能问题。ksar 是 sar 的 Java 图形化版本,可以把系统信息如:cpu、内存、网络、I/O 等使用图形化方式体现。而且支持可以监控远程的 Unix 类操作系统(Linux、AIX、Solaris、HPUX)。
详见IBM文档库:http://www.ibm.com/developerworks/cn/linux/1303_caojh_ksar/
[转载]处理上百万条的数据库如何提高处理查询速度
2013/01/30 分类:数据库 0
1、对查询进行优化,应尽量避免全表扫描,首先应考虑在 where 及 order by 涉及的列上建立索引。
2、应尽量避免在 where 子句中对字段进行 null 值判断,否则将导致引擎放弃使用索引而进行全表扫描,如:
  select id from t where num is null
  可以在num上设置默认值0,确保表中num列没有null值,然后这样查询:
  select id from t where num=0
3、应尽量避免在 where 子句中使用!=或<>操作符,否则将引擎放弃使用索引而进行全表扫描。
4、应尽量避免在 where 子句中使用 or 来连接条件,否则将导致引擎放弃使用索引而进行全表扫描,如:
  select id from t where num=10 or num=20
  可以这样查询:
  select id from t where num=10
  union all
  select id from t where num=20
5、in 和 not in 也要慎用,否则会导致全表扫描,如:
  select id from t where num in(1,2,3)
  对于连续的数值,能用 between 就不要用 in 了:
  select id from t where num between 1 and 3
6、下面的查询也将导致全表扫描:
  select id from t where name like ‘%abc%’
  若要提高效率,可以考虑全文检索。
7、如果在 where 子句中使用参数,也会导致全表扫描。因为SQL只有在运行时才会解析局部变量,但优化程序不能将访问计划的选择推迟到运行时;它必须在编译时进行选择。然而,如果在编译时建立访问计划,变量的值还是未知的,因而无法作为索引选择的输入项。如下面语句将进行全表扫描:
  select id from t where num=@num
  可以改为强制查询使用索引:
  select id from t with(index(索引名)) where num=@num
8、应尽量避免在 where 子句中对字段进行表达式操作,这将导致引擎放弃使用索引而进行全表扫描。如:
  select id from t where num/2=100
  应改为:
  select id from t where num=100*2
9、应尽量避免在where子句中对字段进行函数操作,这将导致引擎放弃使用索引而进行全表扫描。如:
  select id from t where substring(name,1,3)=’abc’–name以abc开头的id
  select id from t where datediff(day,createdate,’2005-11-30′)=0–‘2005-11-30’生成的id
  应改为:
  select id from t where name like ‘abc%’
  select id from t where createdate>=’2005-11-30′ and createdate<’2005-12-1’
10、不要在 where 子句中的“=”左边进行函数、算术运算或其他表达式运算,否则系统将可能无法正确使用索引。
11、在使用索引字段作为条件时,如果该索引是复合索引,那么必须使用到该索引中的第一个字段作为条件时才能保证系统使用该索引,否则该索引将不会被使用,并且应尽可能的让字段顺序与索引顺序相一致。
12、不要写一些没有意义的查询,如需要生成一个空表结构:
  select col1,col2 into #t from t where 1=0
  这类代码不会返回任何结果集,但是会消耗系统资源的,应改成这样:
  create table #t(…)
13、很多时候用 exists 代替 in 是一个好的选择:
  select num from a where num in(select num from b)
  用下面的语句替换:
  select num from a where exists(select 1 from b where num=a.num)\
14、并不是所有索引对查询都有效,SQL是根据表中数据来进行查询优化的,当索引列有大量数据重复时,SQL查询可能不会去利用索引,如一表中有字段sex,male、female几乎各一半,那么即使在sex上建了索引也对查询效率起不了作用。
15、索引并不是越多越好,索引固然可以提高相应的 select 的效率,但同时也降低了 insert 及 update 的效率,因为 insert 或 update 时有可能会重建索引,所以怎样建索引需要慎重考虑,视具体情况而定。一个表的索引数最好不要超过6个,若太多则应考虑一些不常使用到的列上建的索引是否有必要。
16、应尽可能的避免更新 clustered 索引数据列,因为 clustered 索引数据列的顺序就是表记录的物理存储顺序,一旦该列值改变将导致整个表记录的顺序的调整,会耗费相当大的资源。若应用系统需要频繁更新 clustered 索引数据列,那么需要考虑是否应将该索引建为 clustered 索引。
17、尽量使用数字型字段,若只含数值信息的字段尽量不要设计为字符型,这会降低查询和连接的性能,并会增加存储开销。这是因为引擎在处理查询和连接时会逐个比较字符串中每一个字符,而对于数字型而言只需要比较一次就够了。
18、尽可能的使用 varchar/nvarchar 代替 char/nchar ,因为首先变长字段存储空间小,可以节省存储空间,其次对于查询来说,在一个相对较小的字段内搜索效率显然要高些。
19、任何地方都不要使用 select * from t ,用具体的字段列表代替“*”,不要返回用不到的任何字段。
20、尽量使用表变量来代替临时表。如果表变量包含大量数据,请注意索引非常有限(只有主键索引)。
21、避免频繁创建和删除临时表,以减少系统表资源的消耗。
22、临时表并不是不可使用,适当地使用它们可以使某些例程更有效,例如,当需要重复引用大型表或常用表中的某个数据集时。但是,对于一次性事件,最好使用导出表。
23、在新建临时表时,如果一次性插入数据量很大,那么可以使用 select into 代替 create table,避免造成大量 log ,以提高速度;如果数据量不大,为了缓和系统表的资源,应先create table,然后insert。
24、如果使用到了临时表,在存储过程的最后务必将所有的临时表显式删除,先 truncate table ,然后 drop table ,这样可以避免系统表的较长时间锁定。
25、尽量避免使用游标,因为游标的效率较差,如果游标操作的数据超过1万行,那么就应该考虑改写。
26、使用基于游标的方法或临时表方法之前,应先寻找基于集的解决方案来解决问题,基于集的方法通常更有效。
27、与临时表一样,游标并不是不可使用。对小型数据集使用 FAST_FORWARD 游标通常要优于其他逐行处理方法,尤其是在必须引用几个表才能获得所需的数据时。在结果集中包括“合计”的例程通常要比使用游标执行的速度快。如果开发时间允许,基于游标的方法和基于集的方法都可以尝试一下,看哪一种方法的效果更好。
28、在所有的存储过程和触发器的开始处设置 SET NOCOUNT ON ,在结束时设置 SET NOCOUNT OFF 。无需在执行存储过程和触发器的每个语句后向客户端发送 DONE_IN_PROC 消息。
29、尽量避免大事务操作,提高系统并发能力。
30、尽量避免向客户端返回大数据量,若数据量过大,应该考虑相应需求是否合理。
<转载与web开发者>

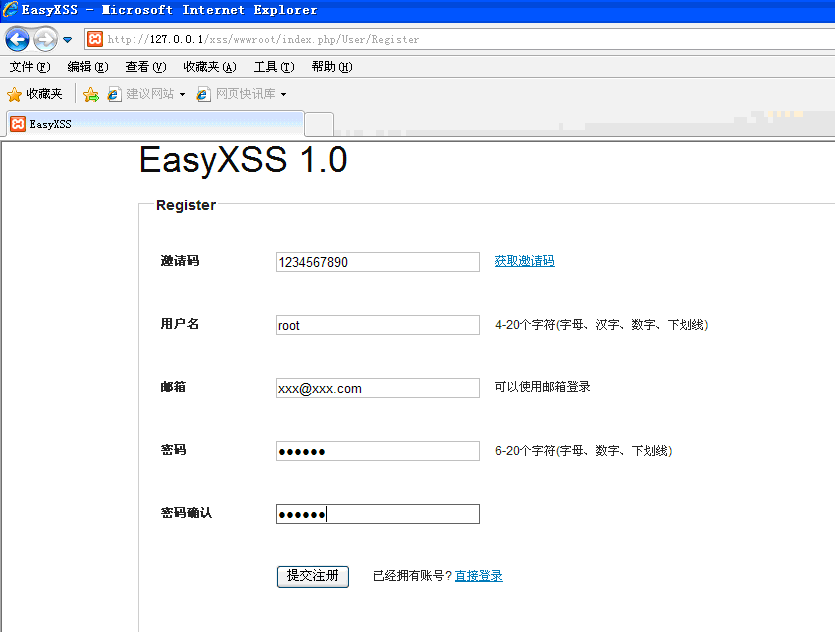
安装EasyXSS 1.0

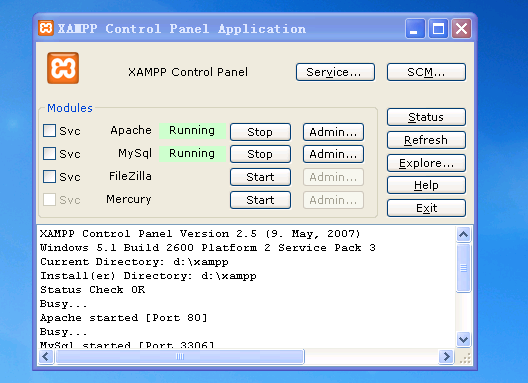
应基友要求写一遍安装EasyXSS 1.0的文章,就在windows临时搭建了一下XSS环境,使用的是XAMPP搭建的,比较方便。
XAMPP截图
11-150x150
1.apache 配置要点

DocumentRoot “D:/xampp/htdocs”

2.解压EASYXSS为xss到web目录下

修改配置文件D:xampphtdocsxssAppConfconfig.php
 'User',
        'URL_MODEL'          => '1',
        'SESSION_AUTO_START' => true,
        'DB_DSN' => 'mysql://root:@127.0.0.1:3306/xss_tw',
        'DB_PREFIX' => 'xss_',
        'MAIL_ADDRESS'=>'info@xss.tw',
        'MAIL_SMTP'=>'smtp.gmail.com',
        'MAIL_LOGINNAME'=>'info@xss.tw',
        'MAIL_PASSWORD'=>'',
        'MAIL_SENDER'=>'info',
        'MAIL_PORT'=>'465',
        'TMPL_PARSE_STRING' =>array(
            '__SITENAME__' =>'EasyXSS 1.0',
            '__SITETITLE__'=>'EasyXSS',
            ),
    );
?>

root为用户名,密码为空
3.创建数据库

mysql> show databases;
+--------------------+
| Database           |
+--------------------+
| information_schema |
| cdcol              |
| mysql              |
| performance_schema |
| phpmyadmin         |
| webauth            |
+--------------------+
6 rows in set (0.00 sec)
mysql> create database xss_tw;
Query OK, 1 row affected (0.00 sec)
mysql> show databases;
+--------------------+
| Database           |
+--------------------+
| information_schema |
| cdcol              |
| mysql              |
| performance_schema |
| phpmyadmin         |
| webauth            |
| xss_tw             |
+--------------------+
7 rows in set (0.00 sec)
D:xamppmysqlbin>mysql.exe -uroot xss_tw -p < data.sql
Enter password:
D:xamppmysqlbin>mysql.exe -uroot -p
Enter password:
Welcome to the MySQL monitor.  Commands end with ; or g.
Your MySQL connection id is 5
Server version: 5.5.8 MySQL Community Server (GPL)
Copyright (c) 2000, 2010, Oracle and/or its affiliates. All rights reserved.
Oracle is a registered trademark of Oracle Corporation and/or its
affiliates. Other names may be trademarks of their respective
owners.
Type 'help;' or 'h' for help. Type 'c' to clear the current input statement.
mysql> use xss_tw
Database changed
mysql> show tables;
+------------------+
| Tables_in_xss_tw |
+------------------+
| xss_ipdata       |
| xss_key          |
| xss_keyemail     |
| xss_project      |
| xss_user         |
| xss_xssresult    |
+------------------+
6 rows in set (0.00 sec)
mysql> select * from xss_key
    -> ;
+-----+-------+------------+-------+------+
| iid | ctime | key        | utime | user |
+-----+-------+------------+-------+------+
|   1 |     0 | 1234567890 |     0 |      |
+-----+-------+------------+-------+------+
1 row in set (0.02 sec)

4.注册用户
22-150x150
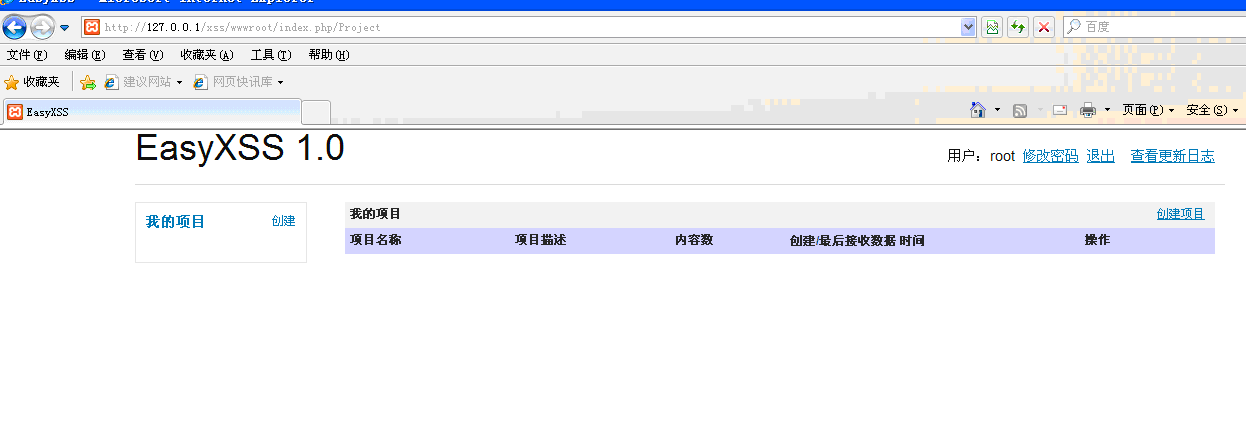
5.登录
33-150x150
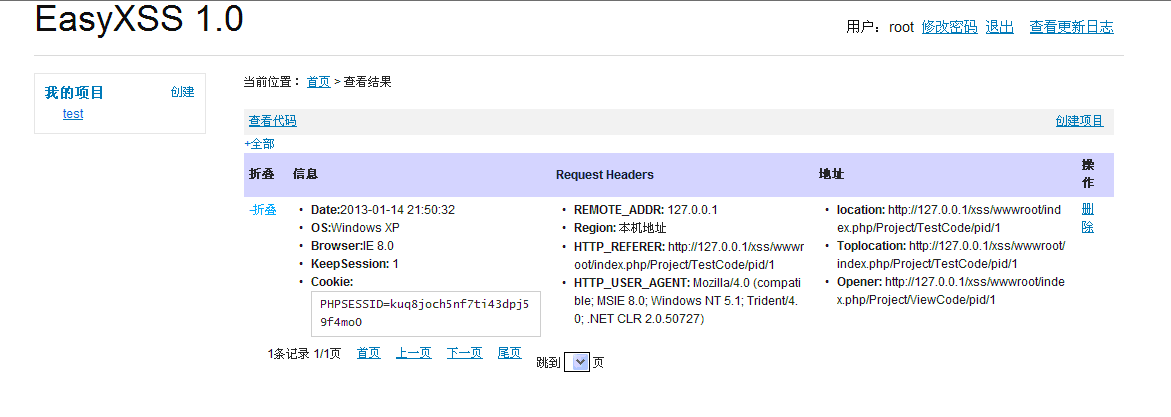
6.测试
44-150x150

nginx自启动脚本

昨天晚上VPS重启了,NGINX没有起来。于是写了一下脚本,自启动的。

cat /etc/init.d/nginx
#!/bin/sh
#
# nginx       This shell script takes care of starting and stopping
#               the nginx.
#
# chkconfig: - 64 36
# description:  nginx.
# processname: nginx
# config: /usr/local/nginx/conf/nginx
# pidfile: /usr/local/nginx/logs/nginx.pid
if [ -f /etc/init.d/functions ]
then
. /etc/init.d/functions
elif [ -f /etc/rc.d/init.d/functions ]
then
. /etc/rc.d/init.d/functions
else
exit 0
fi
nginx=/usr/local/nginx/sbin/nginx
conf=/usr/local/nginx/conf/nginx
prog=nginx
RETVAL=0
start() {
if [ -n "`/sbin/pidof $prog`" ]
then
echo "$prog: already running"
return 1
fi
echo "Starting $prog:"
base=$prog
$nginx
if [ -z "`/sbin/pidof $prog`" ]
then
RETVAL=1
fi
if [ $RETVAL -ne 0 ]
then
echo "Startup failure"
else
echo "Startup success"
fi
return $RETVAL
}
reload() {
if [ -z "`/sbin/pidof $prog`" ]
then
RETVAL=1
fi
if [ $RETVAL -ne 0 ]
then
echo "nginx no have run"
else
echo "reload nginx config"
$nginx -s reload
RETVAL=$?
if [ $RETVAL -ne 0 ]
then
echo "reload nginx config failure"
else
echo "reload nginx config success"
fi
fi
}
stop() {
if [ -z "`/sbin/pidof $prog`" ]
then
RETVAL=1
fi
if [ $RETVAL -ne 0 ]
then
echo "nginx no have run"
else
echo "Stopping $prog:"
$nginx -s stop
RETVAL=$?
if [ $RETVAL -ne 0 ]
then
echo "Shutdown failure"
else
echo "Shutdown success"
fi
fi
}
case "$1" in
start)
start
;;
stop)
stop
;;
status)
status $nginx
RETVAL=$?
;;
restart)
stop
start
;;
reload)
reload
;;
*)
echo "Usage: $prog {start|stop|restart|status|reload}"
exit 1
esac
exit $RETVAL
添加权限和添加自启动
[root@key1088 init.d]# chmod 755 nginx
[root@key1088 init.d]# chkconfig --add nginx
[root@key1088 init.d]# chkconfig --list nginx
nginx           0:off   1:off   2:off   3:off   4:off   5:off   6:off
[root@key1088 init.d]# chkconfig --level 235 nginx on
[root@key1088 init.d]# chkconfig --list nginx
nginx           0:off   1:off   2:on    3:on    4:off   5:on    6:off

安装EASYXSS的一些小问题

EASYXSS项目开源了,很给力的项目,下载地址,

http://wdot.cc/Attack/49.html

在安装过程中,出现了几个小问题,也许别人会遇到。
1.数据库连接问题,
使用ThinkPhp DB_DSN连接方式,用户和密码之间用:号
2.’URL_MODEL’ => ’0′,
如果’URL_MODEL’ => ’0′的话,官方推荐这种方式,但是必须要web服务器支持PATH_INFO,我使用的NGINX默认是不支持的,需要在PHP规则中修改下面代码

location ~ .php($|/) {
root /wwwroot;
fastcgi_pass   127.0.0.1:9000;
fastcgi_index  index.php;
fastcgi_param  SCRIPT_FILENAME  $document_root$fastcgi_script_name;
#Add pathinfo Start
fastcgi_split_path_info ^(.+.php)(.*)$;
fastcgi_param PATH_INFO $fastcgi_path_info;
#Add Pathinfo End
include        fastcgi_params;
}

3.’URL_MODEL’ => ’3′
开始我用的’URL_MODEL’ => ’3′,访问后台是正常了,但是一直得不到数据,一直得到”你妹的”,给个妹子吧 。
看了一下代码AppLibActionEmptyAction.class.php,在GET操作 URL中,没有index,最终调用不了index 函数
把index函数修改为_empty就可以,不是很完美,php不是太懂,就讲究着用吧 。